
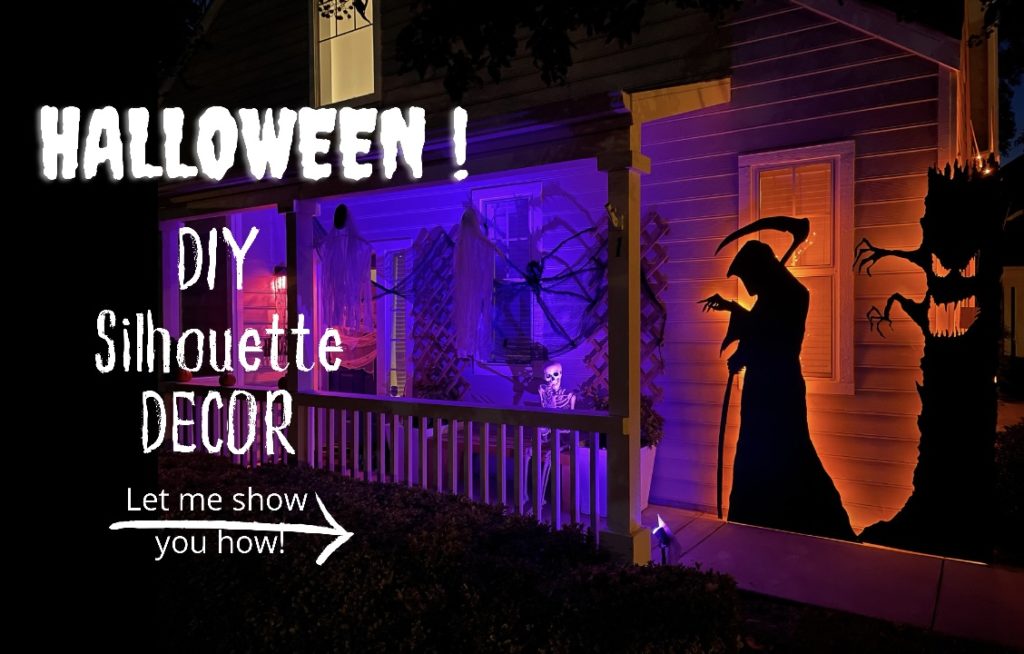
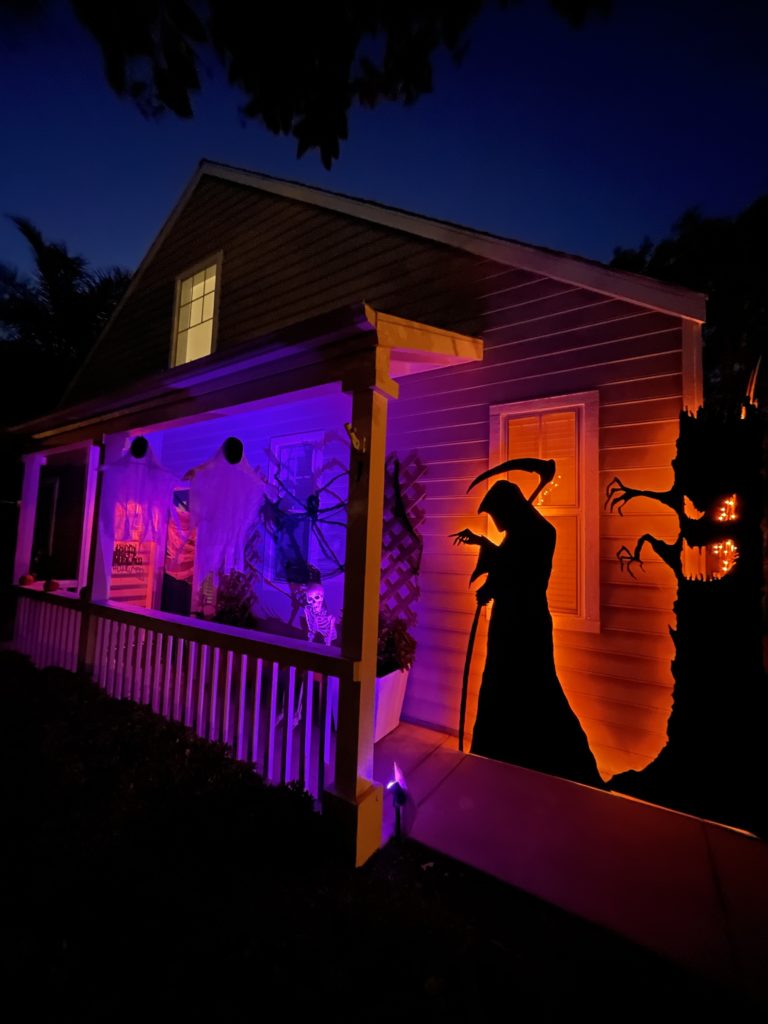
This DIY Silhouette Decor tutorial is an easy DIY that can transform the front of your house into something spooktacular for Halloween using only plywood, sharpie, a Dremel tool, paint & lights.
A little back story: My love for Halloween runs deep. I grew up in South Africa and Halloween only existed in American movies my brother and I used to watch. Houses weren’t decorated, there were no trick-or-treaters, no Halloween parties. So now I get to enjoy it with my kids. I love getting dressed up with them and decorating. Do you dress up for Halloween?
I’m not the first one to do this project. Mcorbin on Instructables shared a tutorial for the witches silhouette many years ago and it inspired me to create my very first silhouette for my garage. I loved it so much I added to it with my own designs as the years went on.
Now let’s get to it. This is what you’ll need to make the DIY Silhouette Decor:
- 1/4 Plywood
- Pencil & marker
- Dremel 3000
- Dremel bit 561 – multi-purpose cutting bit
- #180grit sand paper
- Rustoleum painters touch in flat black
- Poly
- Hot glue gun or 3m hooks
- Orange lights
- Scrap wood for spacers
- Keyhole plates
- Exterior Screws
Few other things I used for silhouettes I’ve made in the past:
- Invisible wire
- Eye screws
- D-ring Hangers
- Twinkling orange lights
- Purple lights
Step 1 – What material to use for your DIY Silhouette Decor
I used the cheapest 1/4 inch plywood I could find at Home Depot. It was a little over $20 at the time. I’ve tried the brown backing board instead of the plywood and even tho it may be cheaper it comes with a lot of cons. It’s a very hard material so it was very difficult to cut in comparison to the plywood. I couldn’t use my dremel so I resorted to using my router and I totally messed up my bit.
Also, it didn’t hold up well in the elements. So it warped a lot. We usually don’t have rain in October in Orange County but one year it rained, and the paint bubbles on the brown board. It didn’t bubble on the plywood. It’s also a lot heavier. So learn from me, even tho it may be tempting to get the brown board, during these crazy wood prices, at $10 or so, it ends up being more of a pain.
Step 2 – Find inspiration for your DIY Silhouette Decor shapes and transfer it to the wood
Find inspiration for your silhouette shapes. I scroll on google and Pinterest for ideas – search for things like witches, or haunted houses, or spooky trees etc. If you’re good at freehand then awesome! Go ahead and draw your image onto the wood. If you’re like me and have a hard time free-hand drawing, you can use a projector or the grid method to help transfer the image onto the wood.
The Halloween silhouettes were so popular I created giant templates for you guys. The templates are digital downloads that you can purchase in my Etsy store. They’re super easy to use! You can print them right at home and build them like a puzzle.
Step 3 – Darken image lines so its easier to cut out
Once you have your sketch on the wood, go over your drawing with a marker. Only mark the lines you will be cutting. I found a very cost-effective pack of 3 markers at the Dollar Tree Store for $1. They work great.
Step 4 – Cut Silhouette out with a Dremel
I use two tables to cut the wood. The space in between the tables makes for a very stable spot to cut where the wood is supported. For outter edges I hang those off the table to cut.
Set up your dremel tool with a #561 multi-purpose cutting bit. Set the depth of your cut to 1/4” and start cutting out your design.
Tip: go slow but have the Dremel tool on a higher speed, around 8. When you come to delicate areas, lower the speed of the Dremel and go extra slow. Sometimes the Dremel will get away from you at high speeds. So you don’t want this to happen if you cutting finer details out.
Step 5 – Smooth edges
Sand edges smooth with #180 grit sandpaper. U can use a courser grit sandpaper to cut into finer details to get sharper corners than the Dremel can accomplish.
Step 6 – Paint black
Paint the entire silhouette black with a foam roller. I used Rustoleum painter’s touch in flat black. It is the best black paint I’ve ever used. It’s so deep and rich in color and the matte finish is so gorgeous.
If you’d like to see what else I’ve used the Matte Black Rustoleum Painters touch paint with, check out my Fireplace post here. I’ve also used the spray option to refinish a vanity light and faucet in my guest bathroom, you can see it here. The matte black paint was a key element when I made the potion bottles for Halloween too, you can see those here.
Make sure you don’t forget the paint the sides of the plywood. Use a paint brush to get into tighter spaces. A roller works great for this too.
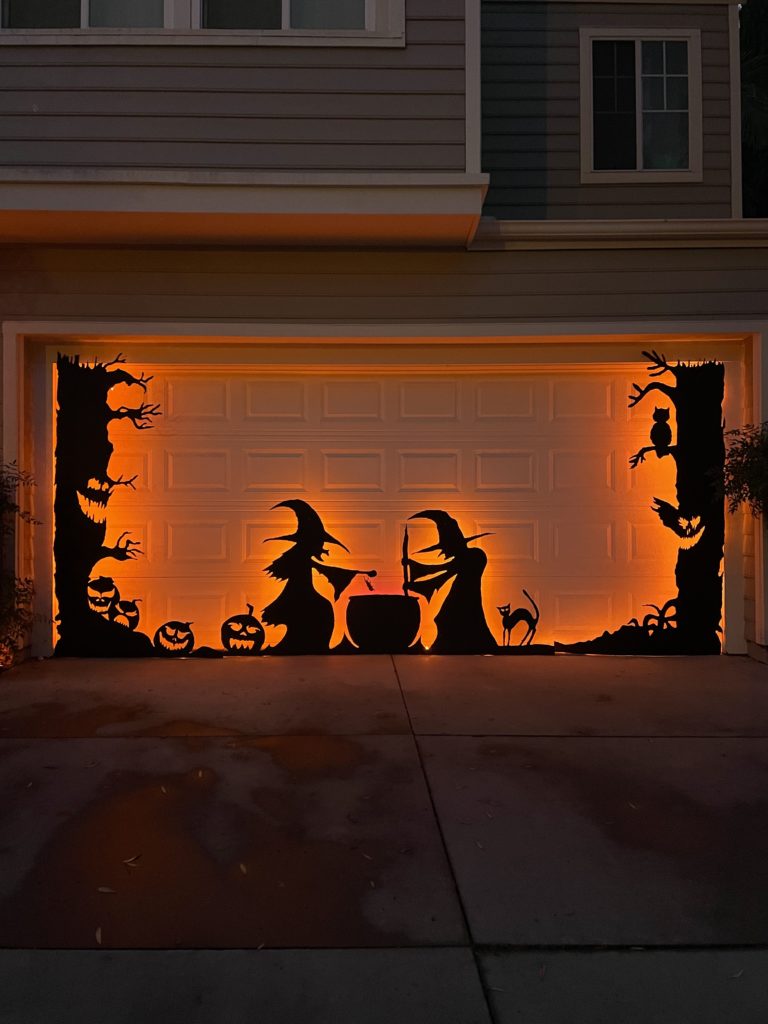
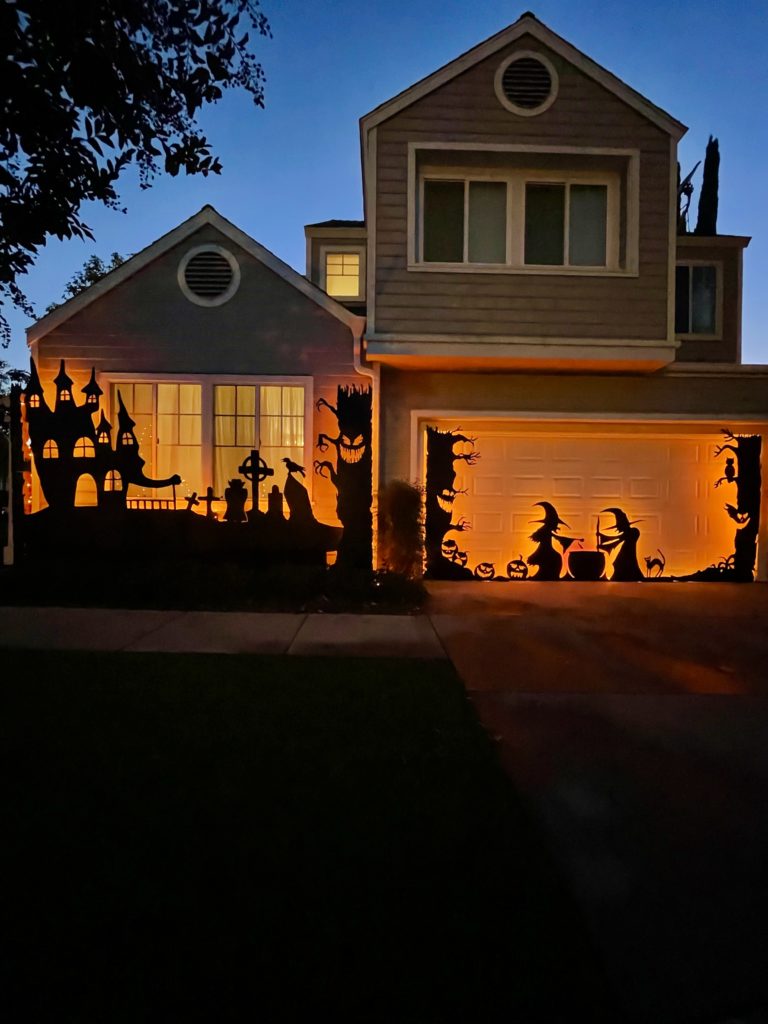
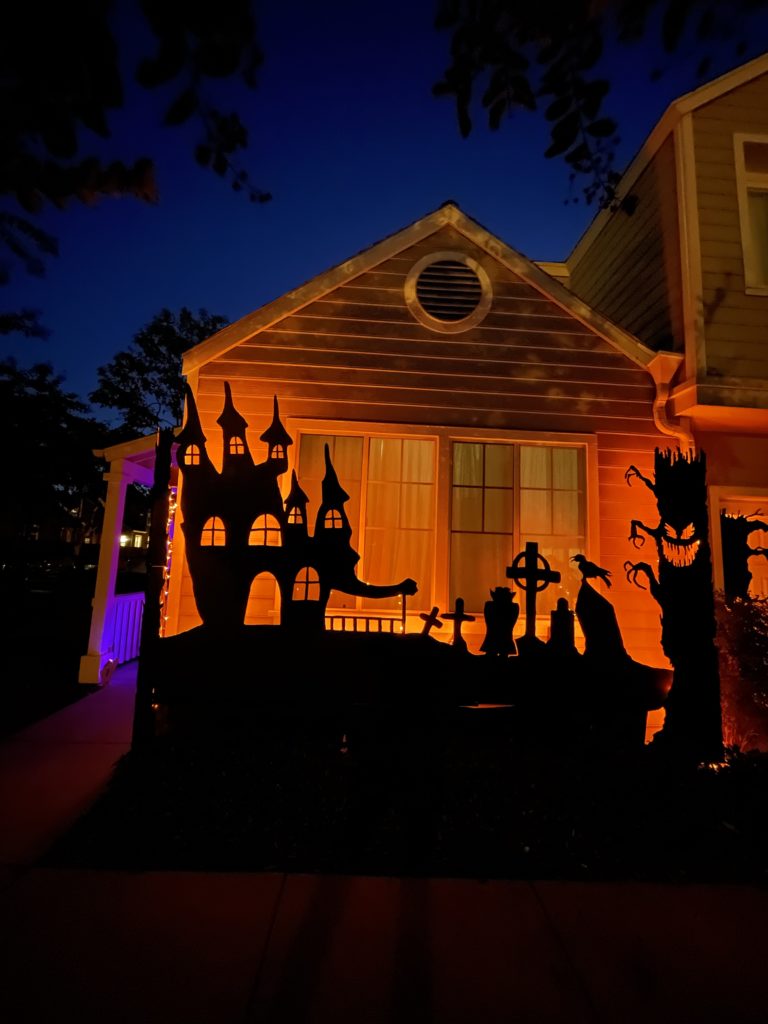
Technically you should finish the silhouette off with a poly but I have yet to find a poly that is matte in finish and I wanted to keep these as matte as I possibly can to prevent any shine on them at night so they can truly be a shadow of black. So I’ve taken my chances with the elements. In Orange County we almost never have rain in October. So my silhouettes have lasted a few years. I made the witches & the spooky trees 4 years ago. The haunted mansion and graveyard I made 2 years ago, and the grim reaper was the new addition this year.
Step 7 – Attach lights
Attach lights to the back. I have used command hooks in the past but I ended up using too many. So I found that hot glue on low heat works really well and can be removed. So basically the lights need to run on the edge of the back of the silhouette. Not too close to the edge tho, every bulb must be hidden.
If you use twinkling lights, it gives it a nice candle-flickering effect. You don’t necessarily have to stick with orange lights, you can use whatever color you wish. I find that orange is the brightest tho. For the cauldron, I wanted it to have a different hue of light coming from within it as if the witches were making some spooky brew. So I bunched together purple lights and hung them nearest to the top of the cauldron.
Step 8 – Attach Silhouettes to the house
Attach the silhouettes to the house. The silhouettes can’t be attached flush to the house. The lights need to have some space to illuminate the back of the silhouette. So I made 3.5” spacers out of 2×4 scrap wood pieces and glued them together. I was a little impatient so I used electrical tape to hold it together while the glue dried.
I wanted to have a minimally invasive system to attach it to the exterior of the house. So in my mind 1-2 small, unnoticeable screws on the front of the house would be best. So I decided to attach a keyhole plate to the spacers. This way, the key hole plate could slot over the small screw on the house and hold up the silhouettes. Make the spaces as long as you need with a 3.5” depth. This way you can put as many screws into the spacers and not into the house.
The silhouettes hanging in front of the garage work with a different system. The witches actually hang from the garage door frame. It does not affect the garage door. The Witches panel sits on the ground, using gravity and the invisible wire, it’s secured pretty well. The two trees on either side of the witches just have a screw that they hang on directly.
Step 9 – See your DIY Silhouette decor come alive at night.
Turn on the lights and enjoy your masterpiece. It really comes alive at night.
How to store your DIY Silhouette Decor?
I had so many questions and concerns on TikTok about where I store these decorations when Halloween is over. So I made a video showing how I took the decorations down and where I stored them in my garage. The silhouettes are made in panels that I detach from each other. Then, because they’re made out of 1/4 inch plywood, they’re skinny and when stacked up together they don’t take up much room at all. So I lay them flat up against my garage wall behind my cupboards and shelving units. You hardly know it’s there. The spacers, lights, screws, and other extra bits get put into a decor box with my other Halloween decor.
To conclude
This is one of my all-time favorite DIY projects. It’s easy, you can be very creative with it, it looks insane at night and pretty cool during the day, and they’re easily stored and take up minimal space. My kids and neighbors love it when I put the decor out each October.
Would you make these silhouette decorations for your house? I may make some for Christmas, but they’ll have a twist! So stay tuned and follow me on IG to find out what I end up doing.
If you make these, send me a pic or post & tag me on IG, I’d love to see what you come up with. It really warms my heart to see you guys inspired to create something.
After I wrote this blog post there were a lot of requests to do a closeup of the silhouettes during the day and night. So here are two videos giving you a run-through:
13 Comments
I’m having trouble finding the patterns for these.
Hi Heather, thanks so much for your interest. I don’t have the Halloween templates up on my Etsy store yet. I’m still working on them. They should be up soon, check back in feb hopefully. The Christmas ones are available now tho. https://www.etsy.com/shop/ShopBarberellaHome Check it out.
Can you send me the Christmas tree and deer temple?
Hi Patti, thanks so much for your interest in the Christmas Silhouettes. I have them listed in my Etsy store. https://www.etsy.com/shop/ShopBarberellaHome
How do you secure the reindeer in front of the trees? I am curious As to how I should secure them since I get a lot of snow
I attach them to the tree behind it using a spacer between them – so they’re kinda floating. You could also attach a spike on the legs for more stability.
Love this sooo much! I’m curious, how many pieces of plywood did you use for the full Christmas design? And also can you purchase the Christmas design as a whole package or have to purchase each design individually?
Thanks so much. The Christmas silhouettes are sold separately. I used 6 sheets of plywood for the full Christmas display.
Your work is remarkable! I love the detail in every piece. Keep up the good work.❤️
Thank you 🙂
Can you send me the Christmas tree and deer temple?
If you have naturelly
hi Madeleine, you can find my templates in my Etsy store: https://www.etsy.com/shop/ShopBarberellaHome