
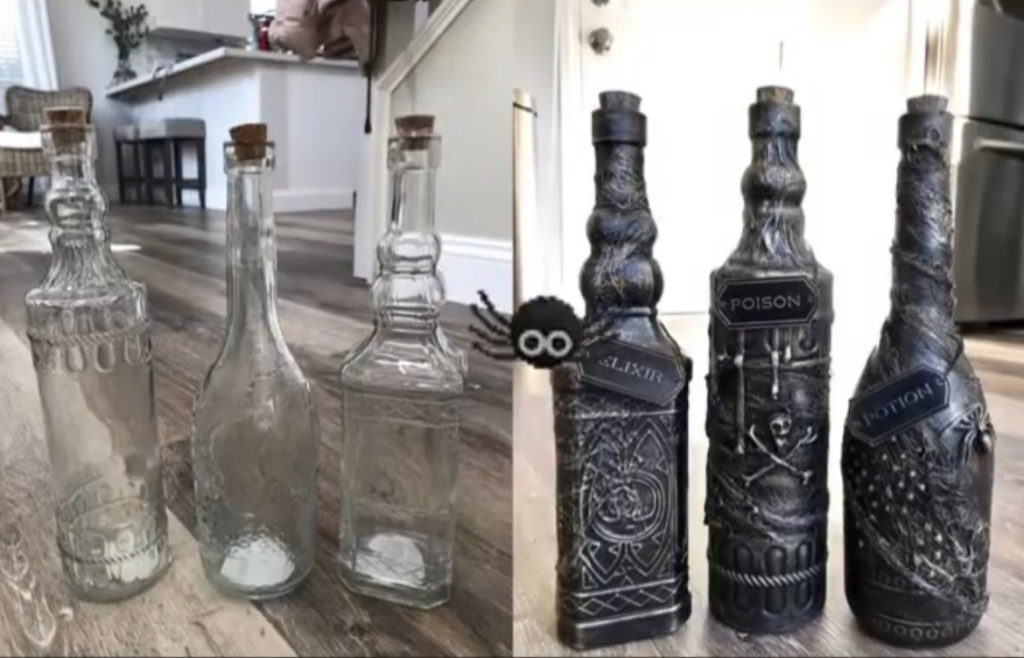
I have always admired and loved stage and movie set design and how you can make something look authentic with just a few art supplies like paint and glue. I’m going to show you how to make Authentic Potion Bottles out of $1 bottles I found at the Dollar Tree store.
A few years back I made these potion bottles out of bigger bottles I found at the Dollar Tree. They are some of my favorite pieces to put out during Halloween. So I thought I would make a few more so I can share how I created these spooky additions.
Do you decorate for Halloween? Where I grew up, in South Africa, Halloween wasn’t a big holiday. I only knew of Halloween thru the American movies we used to watch but I sure did love it. Being in the United States for 18 years or so, Halloween has become one of my favorite holidays of the year. So without any further ado, let’s get into this DIY spooky potion bottle tutorial.
Supples you will need for the potion bottles:
- $1 Bottles or jars from the Dollar tree
- Matte mod podge
- Gauze
- Kitchen towel
- Baking soda
- Rustoleum matte black spray paint
- Martha Stewart metallic silver paint
- Gold leafing or any bright gold paint
- Paint brush
Supplies you will need for the potion bottle tags:
- Black Polymer clay
- Rolling pin OR clay roller
- These dot tools are the ones I have but this dot tool set comes with a roller, knife, and a bunch of other tools.
- Knife
- Mug – I used a glossy mug
- Paint – will use the same paint you used for the bottles
- Brass chain – I used chain I already had from some years back. But this one from Michaels would work. Here’s a small link chain, a big link chain, and a round link chain from Amazon. If you check out hobby lobby I’m sure they’ll have some options too.
- Flat headpins for jewelry making
- Pliers
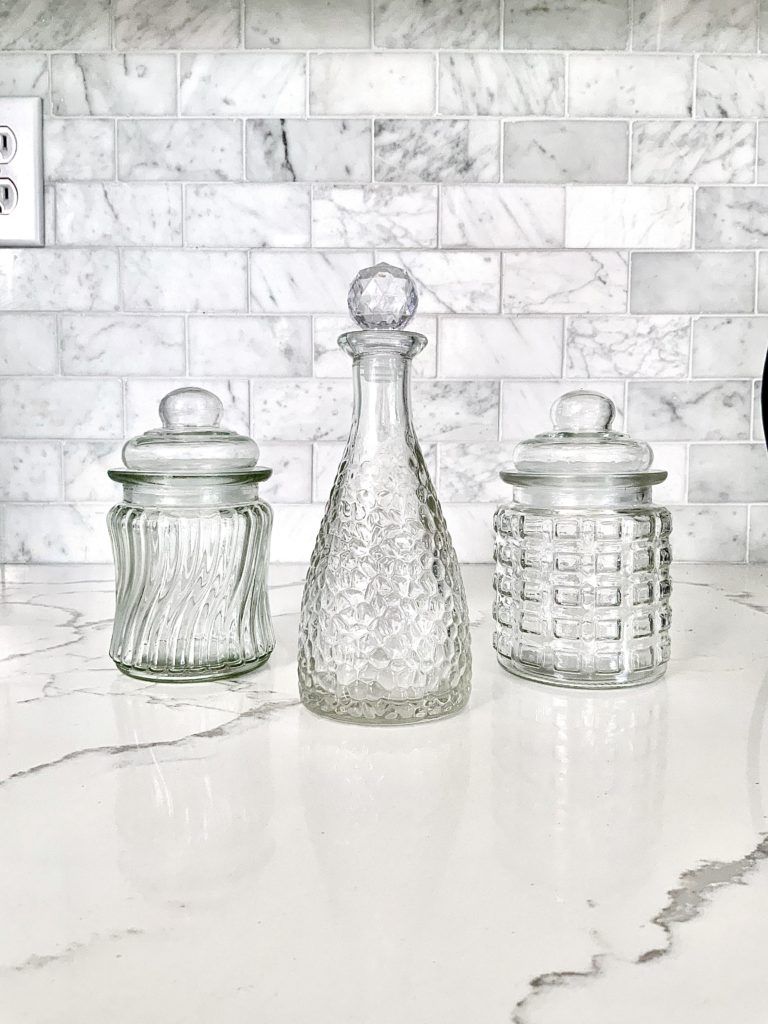
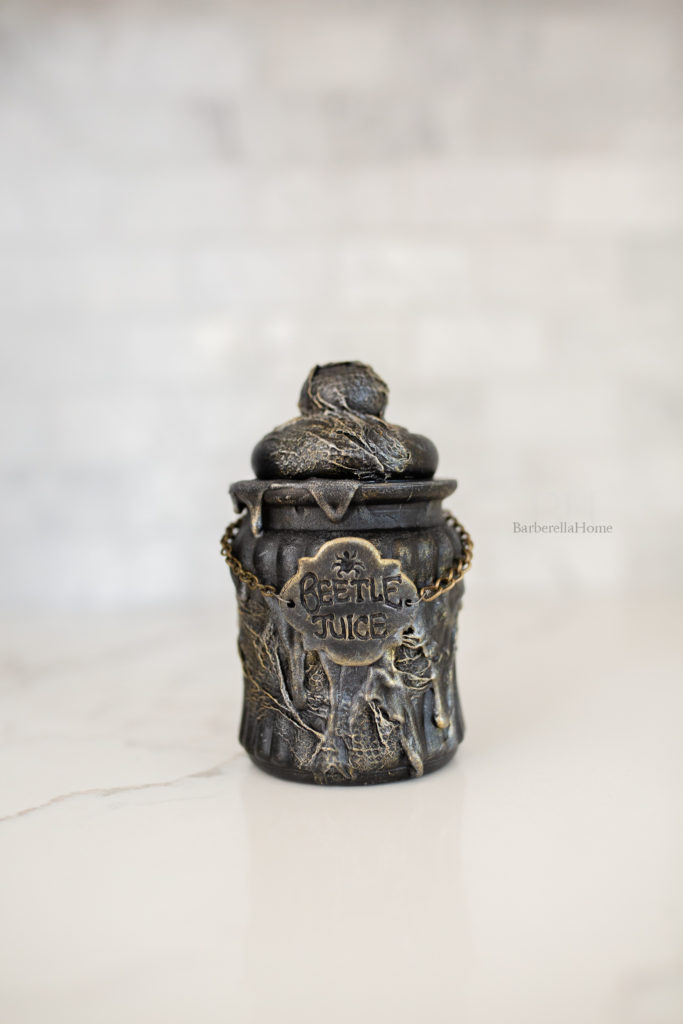
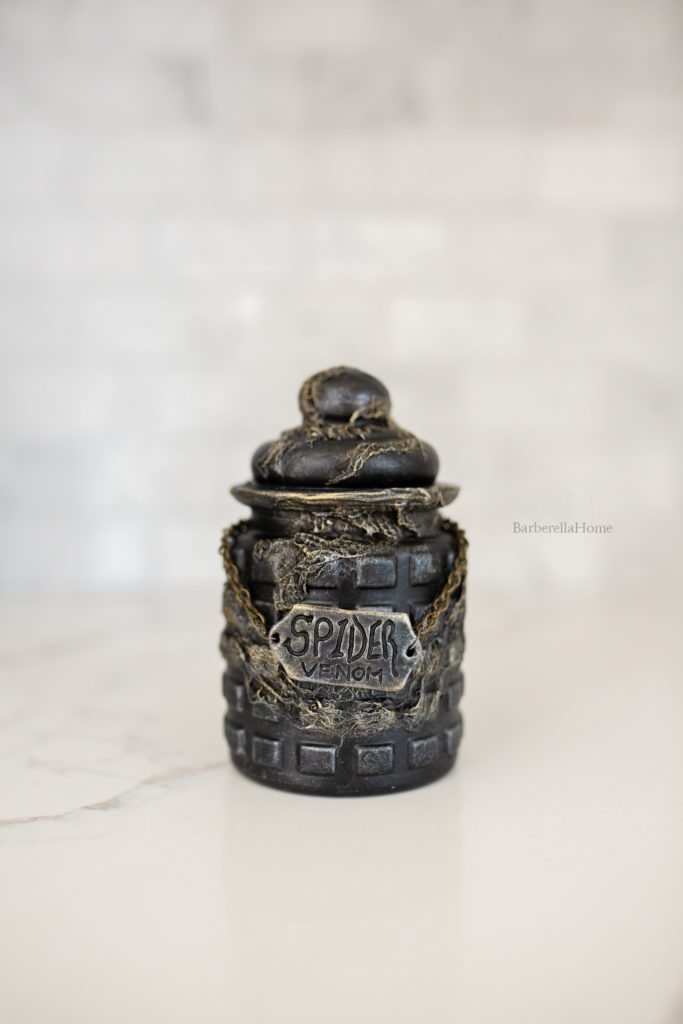
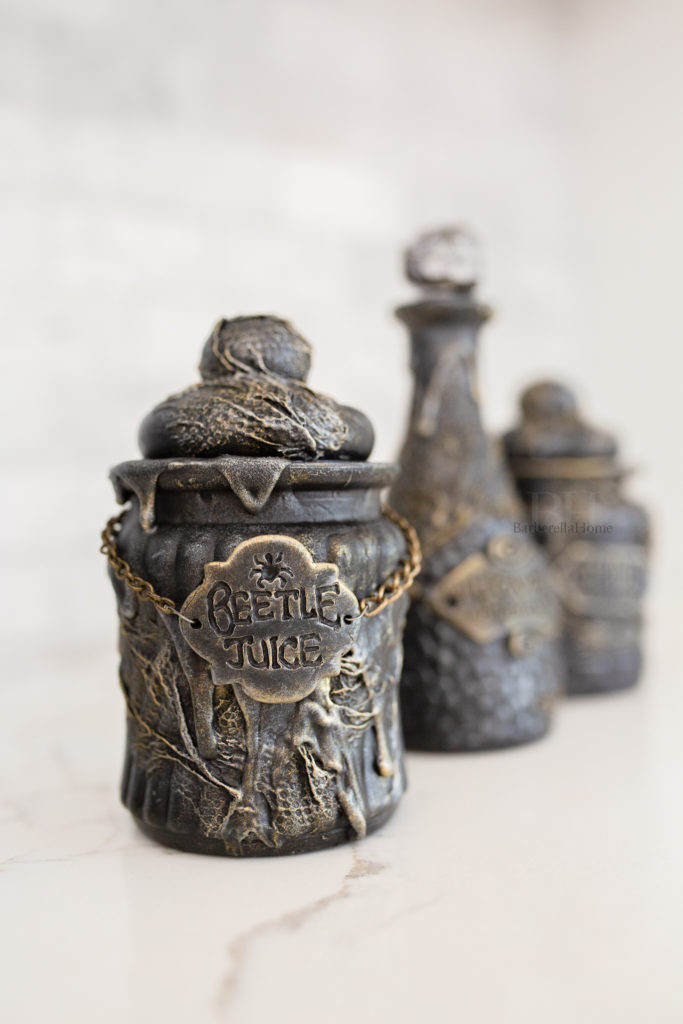
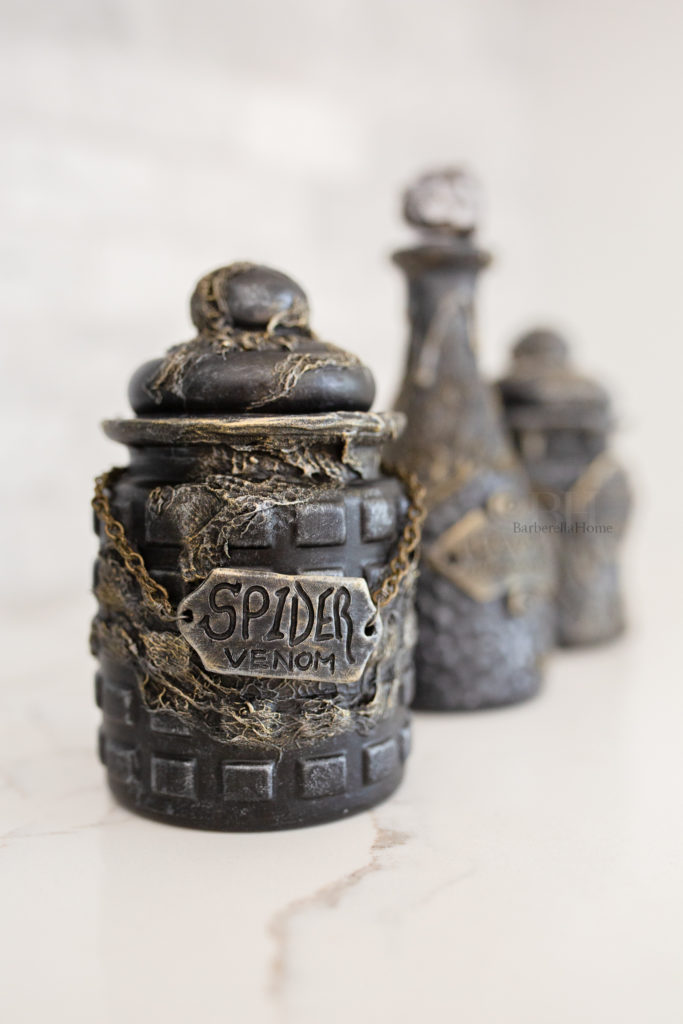
The dollar tree has a very nice array of glassware to choose from for projects like this. I look out for anything with shape and texture. Finding a jar or a bottle with a lid is a must. These are the jars I found at the Dollar Tree:
Adding interesting texture to the potion bottles and jars.
Gauze
Even though the bottle and jars had interesting texture already, I wanted to add in some extra spookiness to it. The gauze works out perfect for this because when you adhere it onto the bottle and push it into shape, it truly looks like thick cobwebs.
First, I painted mod podge directly onto the bottle where I wanted the gauze to lay and then I pressed the gauze to the bottle. It’ll seem like it’s not really sticking to the bottle, but after painting more mod podge on top of the gauze, it becomes a lot easier to maneuver into place. Stretch it out. Gather it. You can’t go wrong with this, just go with it! Every bottle will be unique.
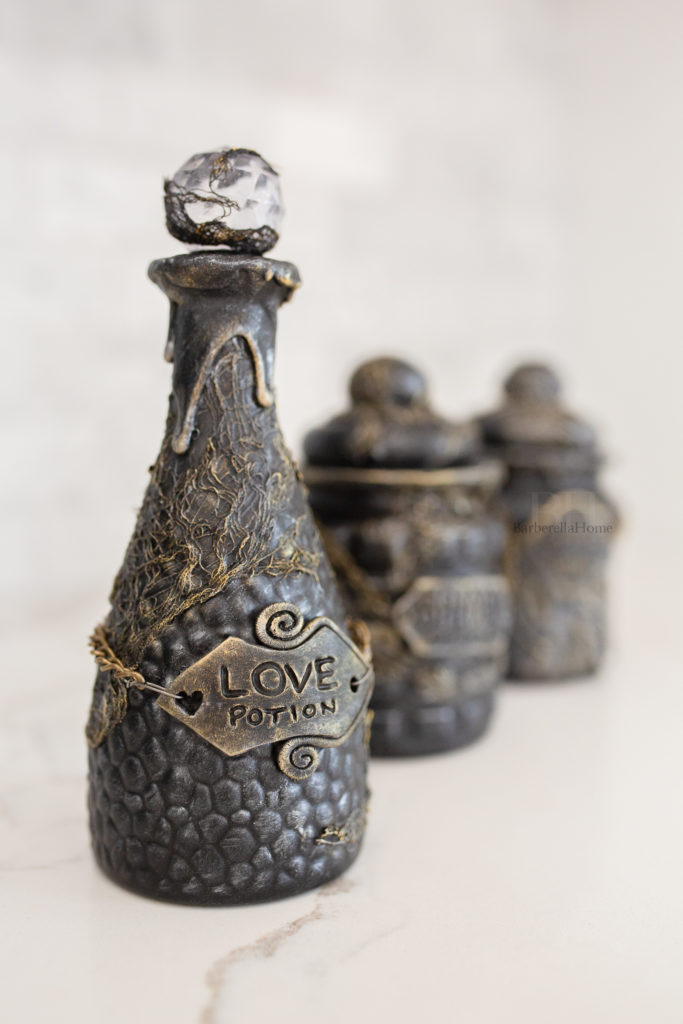
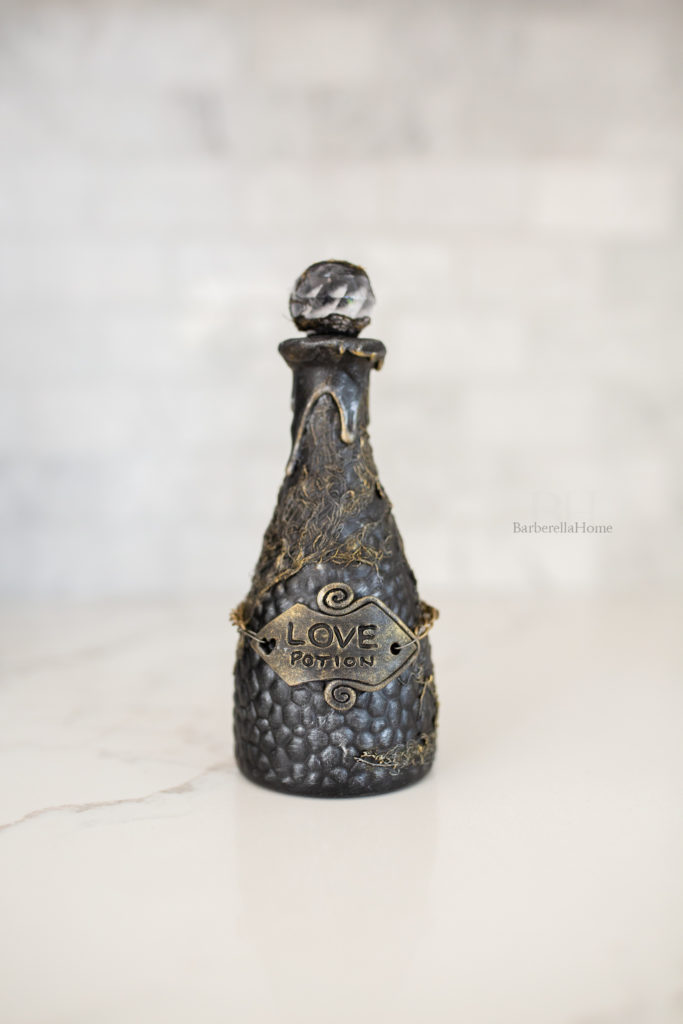
The crystal stopper for the bottle was missing something. I wanted it to remain a crystal stopper but it was too sparkly & clean for the spooky look I was after. So instead of painting it black, I adhered black gauze to it in a spiral fashion with mod podge. Cleaned up the excess glue with a q-tip and it ended u looking perfect. By cleaning up the excess with a q-tip is made parts of the crystal milky, which gave it an authentically old look.
Kitchen towel
Often, I’ll look around the house for things to use for texture. What I found worked really well was bounty kitchen towel. I know, how right? My mind was blown how well it worked.
Tear off a piece, make sure it has no straight edges. Paint modpodge to the jar where you want the kitchen towel to lay. Press the kitchen towel down onto the glass. Again, it’ll seem like the kitchen towel won’t stick but once you paint mod podge over the top of it, it changes everything. You can use your paint brush to push it into shape and gather to add texture.
Drips
There’s nothing more icky than drips on a bottle, and if those drips are creepy things like beetle juice, or goo, then it gets the senses going. So it’s a perfect addition to these spooky potion bottles. I did say they looked authentic.
For the larger bottles, I used straight mod podge and poured it on the neck of the bottle and let it drip down. Straight mod podge is a little runnier so the drips were long. If your bottle is large, it’s perfect for the size.
For small stubby jars however, I needed the mod podge to be thicker so the drips wouldn’t run so fast. I experimented and added baking soda to the mod podge. And it worked! You can adjust your consistency to get your desired effect. So I added baking soda until I got the desired consistency to drip slower.
I used the back of my paint brush to scoop up some mod podge mixture and tapped it off on the top of the jars. Sometimes it needed a little help to drip further, so I used the surface I was working on to tap the bottles a little to help the drips fall.
Leave out for a day to completely dry before moving onto the next steps.
The power of paint
Matte Black spray paint
My all time favorite black spray paint is Rustoleum painters touch in matte black. Check out this post where I transform my bathroom vanity light and my faucet with Rustoleum Painters touch spray paint.
The bottles and jars only needed one coat. Make sure you get into all the creases and folds. The entire bottle needs to be covered in black.
I waited an hour for the paint to dry before I went to the next step.
Drybrush the potion bottles silver
I used Martha Stewart metallic silver paint to dry brush the texture. This makes all the detail pop. You can dry brush as much or less as you like. I like to drybrush most of the bottle with silver. I feel that if there was parts perfectly black, it wouldn’t have that ‘old’ look.
The trick to dry brushing is that you have to put enough paint on the brush to coat the bristles, but then you have to stipple most of the paint off, until the brush is almost ‘dry’. Some may say it’s a waste of paint, but I think dry brushing gives the piece so much depth, so it’s worth it.
Dry-brush the potion bottles gold
I used Precious Metals premium leafing finish. I bought this tub years ago and still find things to use it on. The gold color is so vivid. I absolutely love it. I tried to find a link for you guys but wasn’t successful. This option should work the same.
Unlike the silver paint, I only wanted certain parts touched with gold. So I used a very light hand, with a ‘dry’ brush, to brush gold on the things I wanted to accent. I think this step ‘makes’ the whole piece.
Potion bottle tags
I had found tags at the DollarSspot section at Target years back when I made the larger potion bottles but I couldn’t find any that were even close. So I decided to make them. I had made mug art out of polymer clay a couple years back – this is how they turned out:
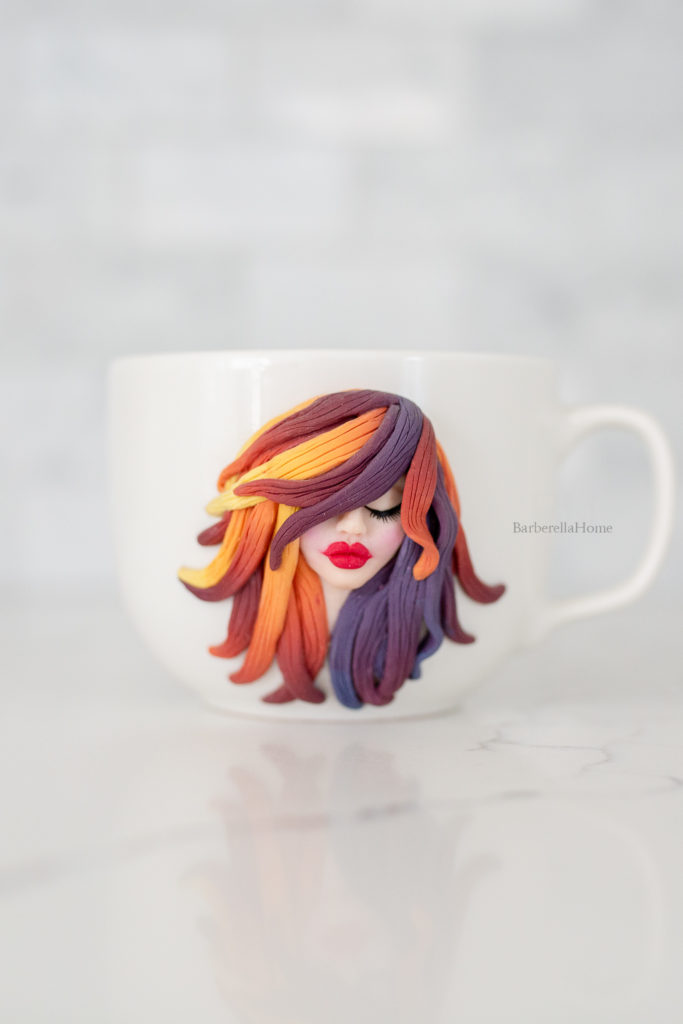
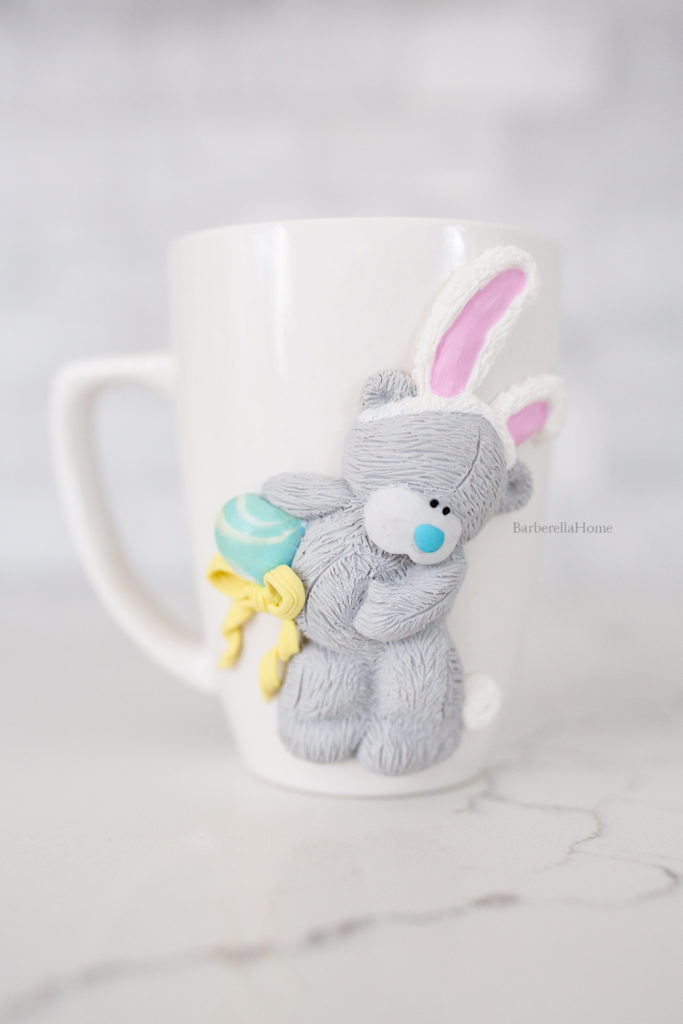
So with that experience, I knew it was possible to design a tag on a mug, bake it in the oven, then pop it off, and use it as a tag on the potion bottles. The mug would also give the tag the curvature feature I was looking for. A side note: The clay doesn’t mark or stick to the mug – at least it didn’t with mine. The tag just popped right off and kept its shape.
Steps to make the tags for the potion bottle:
- So first, you want to soften the Soft Fimo Polymer clay, you can do this by squishing it with your fingers.
- Then you will need to roll out the clay flat. You can use a rolling pin for this or you can use a clay roller machine like I did. You want the clay to be about 1/8 of an inch thick.
- Once you have it rolled out flat, place it on the mug so you can start designing your tag.
- I bought a set of dot tools and I love them, these are similar here. Draw out your shape of the tag lightly. If you make a mistake, It’s easy to erase if you rub the surface smooth.
- Once you have your shape, get a sharp tool and cut the excess off.
- Clean up edges with a fine dot tool or sharp point. You can use your finger to smooth any edges.
- Make two holes on either side of the tag for the chain to attach to.
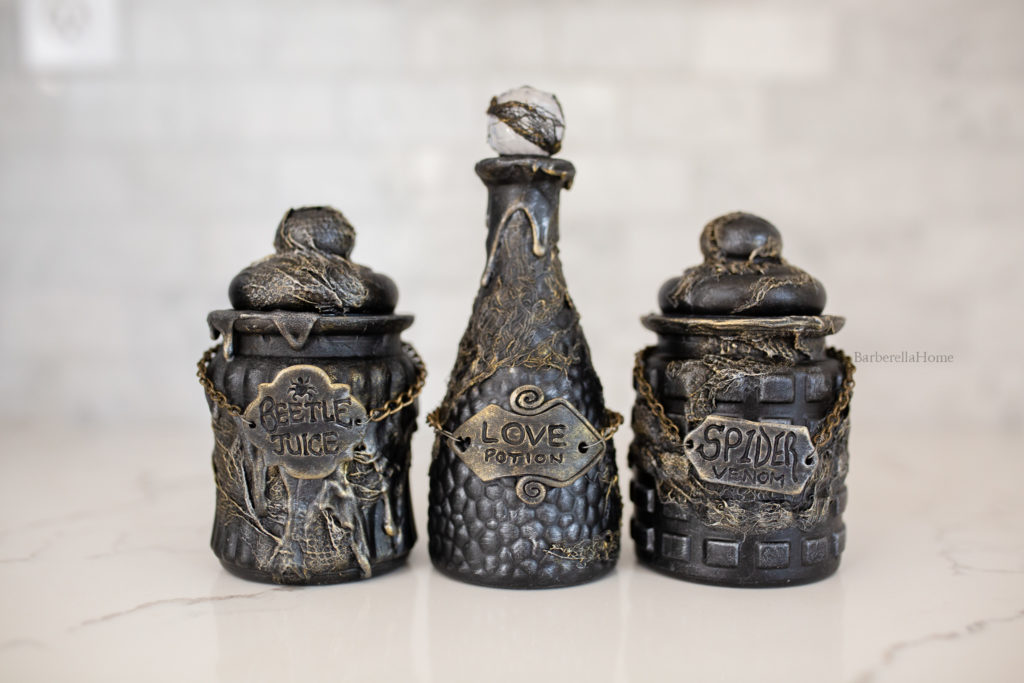
- Then lightly write LOVE POTION, or BEETLE JUICE, or SPIDER VENOM, or anything you want on the tags. Add a spider or a heart. Whatever floats your boat.
- Finally, when you are sure of your word choice and design, deepen the letters. Don’t go too deep that it reaches the mug. But go deep enough that when you dry brush the tag, the indentation of the letters remains black. This way the words stand out.
- Leave your design on the mug, do not try to remove it. It’ll stretch out and ruin the shape.
Drying the clay
- Preheat oven at 270°F. While it’s preheating, place the mug in the oven to allow it to slowly warm up with the oven.
- Once the oven is preheated then bake for 60mins.
- After the 60mins is up, turn the oven off and leave the mug inside the oven to cool with the oven.
Details & attaching the tag to the chain.
After cooling, with a sharp tool, you can easily pop the tag off the mug without much force. The tag should feel hard, it should hold its shape, but also feel slightly flexible.
Repeat drybrushing steps with silver and gold.
Attach chain to tags by using a flat head pin (used for jewelry making). I only had silver rings at the time to attach the brass chain but it didn’t look good. So I used a flat head pin. It looked rustic but I think it added to the spooky charm of the bottles. I already had chain from previous projects but if you’re looking to buy similar chains, scroll up to the supply list, there’s options from Amazon and Michaels there.
Concluding these DIY Spooky Potion Bottles.
You could totally forgo the chain and just glue the tags to the bottles using e-6000 glue. You’d skip out the part where you make holes for the chain on either side of the tag tho.
I like how the chains clang over the bottles and how they can be interchangeable or changed out if I wanted something different at a later stage.
So what do you think? Would you try make these? If you do, I’d love to see it. Please send me a DM on Instagram or post a pic and tag @BarberellaHome. It brings me great joy to see all of your DIYs.
If you would like to purchase these potion bottles, head over to my Etsy shop and check out my listings.
*DISCLAIMER: the product links above are affiliate links. Which means that if you purchase through the links I’ll receive a small commission. This helps support BarberellaHome and allows us to continue to make videos and content like this. Thank you for your support!
3 Comments
Hi, thanks a lot for sharing this Halloween idea – the step by step videos are great – wish I would have found it before, as I decided to make my bottles. Because my problem was, how make a “realistic dripping” at the edges – couldn’t find a good medium for that (and all I tried were all too fluid and just ran down the bottles).
For next year I plan a make over for my bottles with your instructions.
Wish you all the best
Sabine
Hi, I have more about the installation on my IG page: @BarberellaHome